Welcome to Moda Fabrics!
Winter Frost - Starflake
Winter Frost - Starflake
Welcome to Day 3 of the Moda Bake Shop Countdown to Christmas! I’m Jen Daly and I’m thrilled to be here with you today to share my Starflake block.
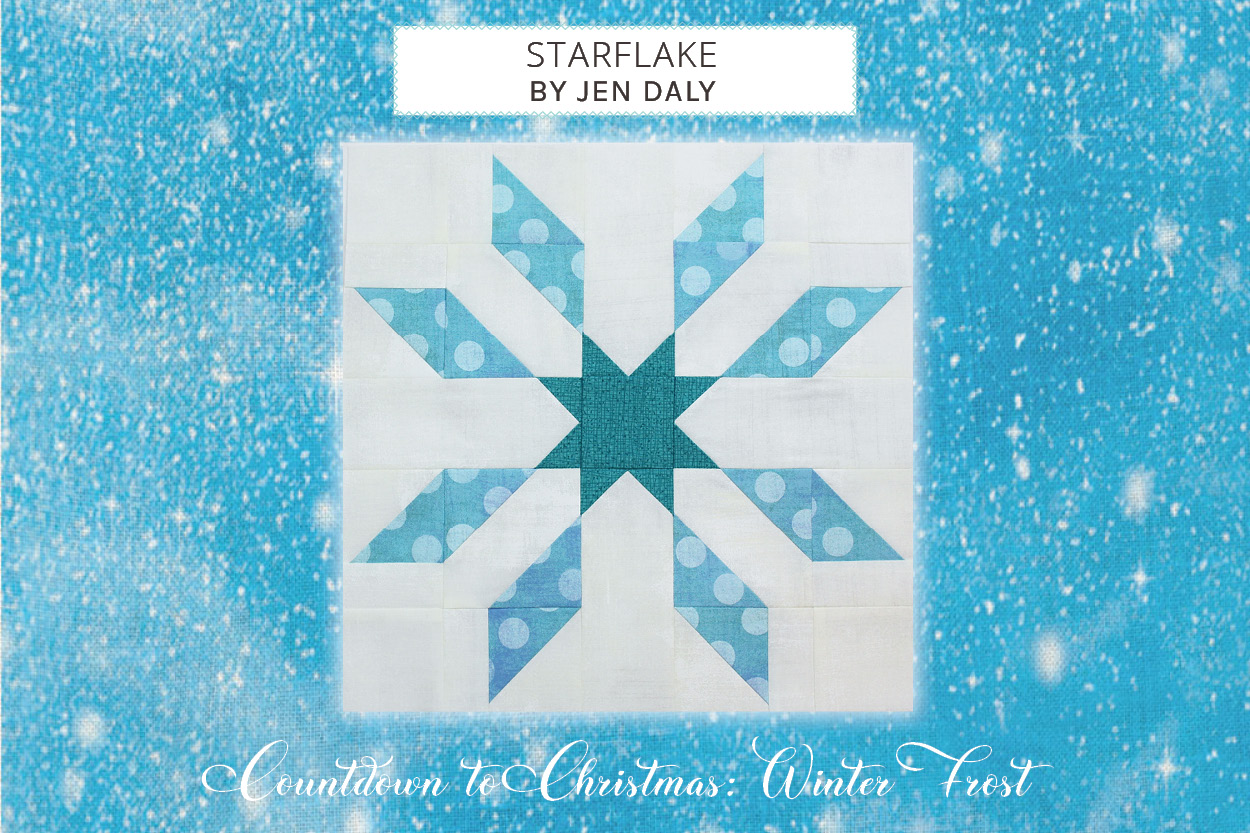
Starflake is one of the block options in the 2020 Countdown to Christmas - Winter Frost. For more info about this quilt-along, check out the Frequently Asked Questions and join our Moda Bake Shop Bakers group. Find all the blocks {here}.
Chef's Notes:
For a fun variation that really looks like a snowflake, try substituting a white print for the teal and turquoise prints and use a blue print for the background.
YIELD
12" finished block
INGREDIENTS
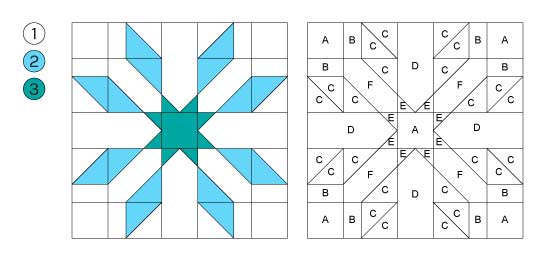
From fabric 1, cut:
{A} (4) 2½” squares
{B} (8) 1½” x 2½” rectangles
{C} (4) 3” squares
{E} (4) 2½” x 5½” rectangles
{F} (4) 3½” squares
From fabric 2, cut:
{C} (4) 3” squares
{D} (8) 2½” squares
From fabric 3, cut:
{A} (1) 2½” square
{G} (8) 1½” squares
INSTRUCTIONS
STEP 1. MAKE HALF SQUARE TRIANGLES
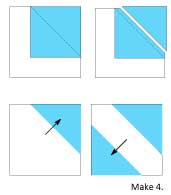
On the wrong side of 4 white print 3” squares, use a pencil to lightly draw a diagonal line from corner to corner. Layer a marked square atop a turquoise print 3” square with right sides together. Stitch the pair together a scant ¼” from either side of the drawn line
Cut the pair apart on the drawn line to make 2 half-square triangles. Press seam allowances toward the turquoise and trim HSTs to measure 2½” x 2½” (including seam allowances).
Repeat to make 8 HSTs.

STEP 2. MAKE DOUBLE TRIANGLE UNITS
On the wrong side of 8 turquoise print 2½” squares, use a pencil to lightly draw a diagonal line from corner to corner. Layer a marked turquoise 2½” square atop one corner of a white print 3½” square with right sides together. Stitch the pair together on the drawn line.
Trim seam allowance to ¼” and press toward the turquoise.
Repeat at the opposite corner of the white 3½” square, paying careful attention to the orientation of the stitching line. Repeat to make 4 double triangle units.
STEP 3. MAKE UNIT A
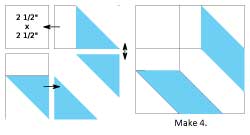
For one Unit A, gather 2 HST units, 1 double triangle unit, 2 white print 1½” x 2½” rectangles, and 1 white 2½” square.
Sew a white print 1½” x 2½” rectangle to the left side of an HST, paying careful attention to the orientation of the HST. Press seam allowance toward the white rectangle.
Sew a white print 1½” x 2½” rectangle to the right side of the remaining HST, paying careful attention to the orientation of the HST. Press seam allowance toward the white rectangle.
Lay out the units from step 2 and 3, the double triangle unit, and the white print 2½” square in 2 horizontal rows. Stitch together the pieces in each row, pressing the seam allowances as indicated by the arrows. Stitch together the rows. Press the seam allowances open to finish the Unit A.
Repeat to make 4 Unit As.
STEP 4. MAKE UNIT B
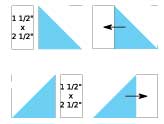
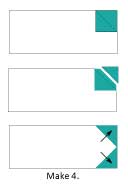
On the wrong side of 8 teal print 1½” squares, use a pencil to lightly draw a diagonal line from corner to corner. Layer a marked teal print 1½” square atop one corner of a white print 2½” x 5½” rectangle with right sides together as shown. Stitch the pair together on the drawn line.
Trim seam allowance to ¼” and press toward the teal.
Repeat at adjacent corner (on short side) of the white print 2½” x 5½” rectangle, paying careful attention to the orientation of the stitching line.
Repeat to make 4 Unit Bs.
STEP 5. ASSEMBLE BLOCK
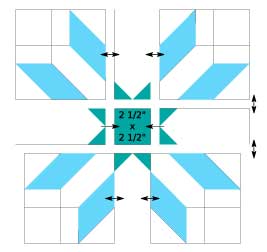
Lay out 4 Unit As, 4 Unit Bs, and teal print 2½” square in 3 horizontal rows as shown. Stitch together the pieces in each row, pressing the seam allowances as indicated by the arrows.
Stitch together the rows. Press the seam allowances open to finish the block.
Jen Daly
If you missed any of the earlier posts -

Comments